Showing posts with label field. Show all posts

Wednesday, 13 June 2012

Progress on my 28mm Dark Ages Village Project- Part 1 inc. Jarl's Longhouse

So as I'm not working today and don't feel like approaching any of my uni work I thought I'd crack on with my attempt at making a 28mm viking village.

This is the progression from yesterday's posts- I'm working pretty quick on this project.

If you intend to follow the Jarl's longhouse build, pre-warning you that you'll be needing to eat a lot of asian cuisine.

Basing materials supplied by Famous Gaming, check them out!

The Jarl's Longhouse pre-paint looks like this:


If you're keen scroll on down!


So Part 1: some wicker style fencing & updates from yesterday!


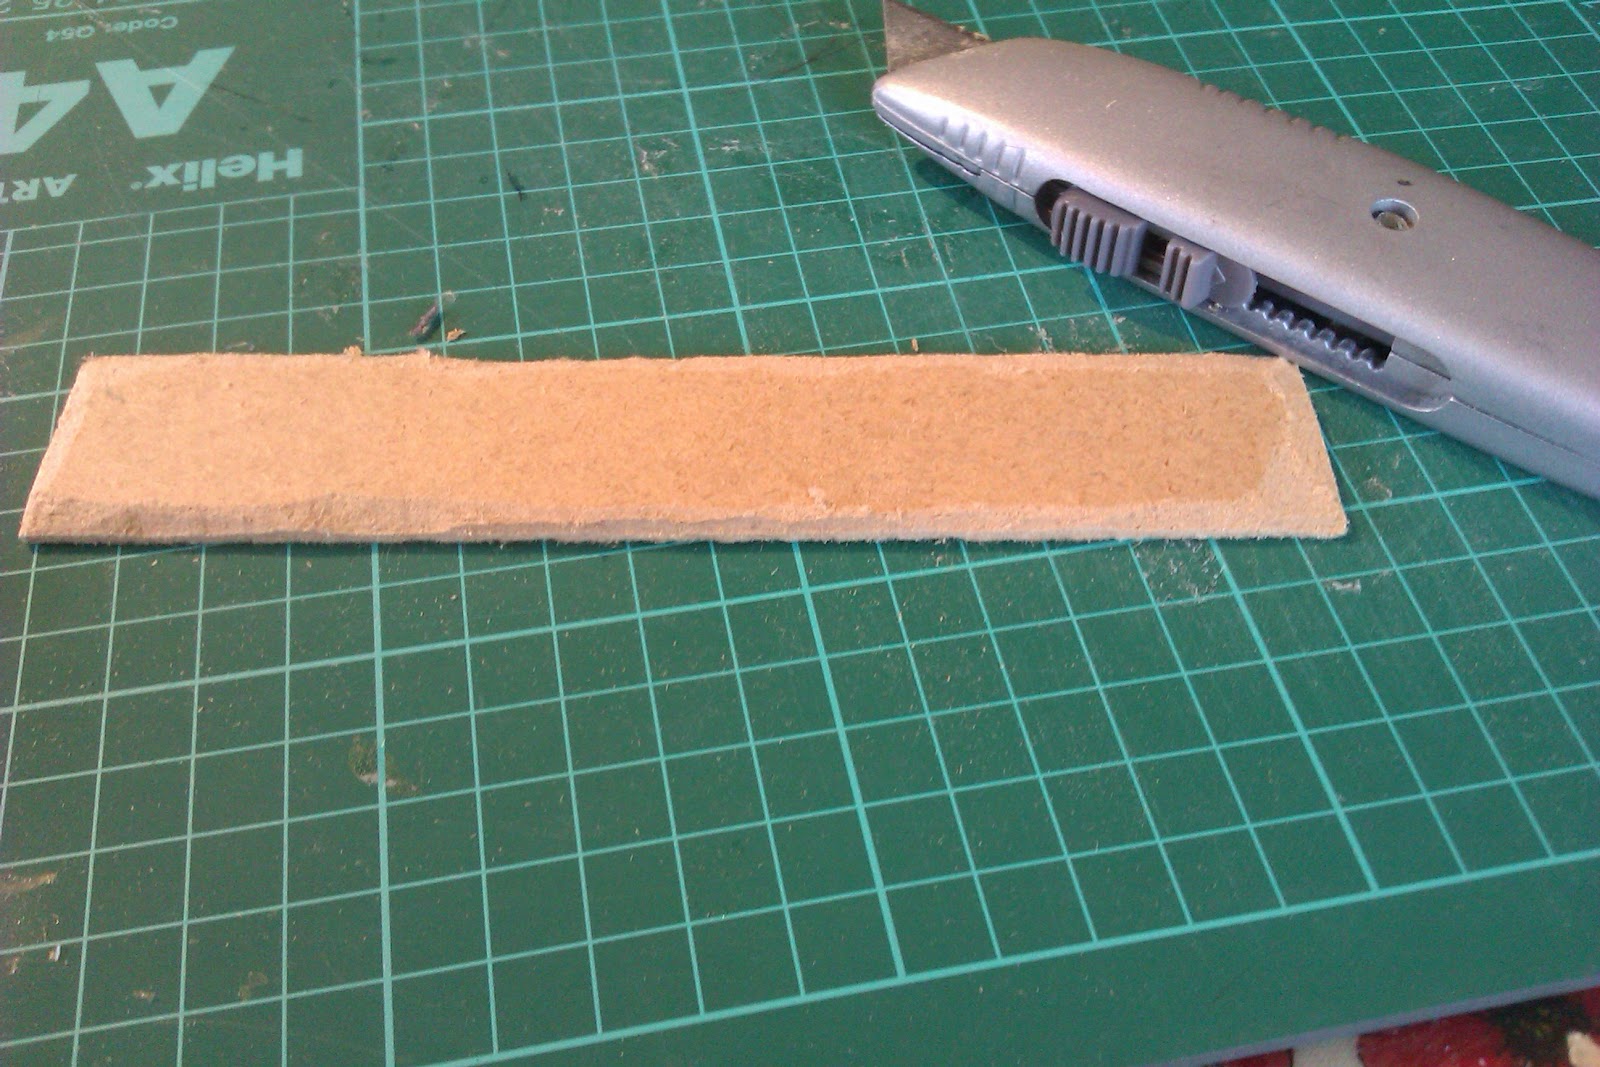
The kit needed: trusty glue gun with something to stop it dripping on that lovely tablecloth, some chopsticks from Yo! sushi, a length of cut hardboard, some old broken headphones, some wire, clippers and a stanley knife.


added a bevel for realism


chopped the chopsticks into useable lengths, neated em up and cut into them to create a more log like appearance. The ones on the left have been trimmed, see the difference?


Ready for sticking


I tried them in a completely linear arrangement and didnt have so much success so switched to a slightly staggered one. Then glued them all in place with the hot glue.


Cut the wire and headphone leads into strips to represent wicker and other bendy boughs from trees and arrange them between the chopstick posts. Add some hot glue here and there to get it to stick together. Trim off any excess glue with the clippers or knife


Wove wiring in the same way around my corrall, and added a tuft in the corner.


Then based it in with PVA glue, an old crappy brush and a basing mix of different sand grains, old plaster bits and small rock particles. All are available at Famous Gaming on eBay, check out their rubble mix, its awesome. Also based everything from yesterday, and added some fine sand to the walls of the buildings to allow for a plaster effect.


I then moved on to gluing down the thatch roofs form yesterday. I mixed about 70% pva glue to 30% water and put it into a mister bottle, the kind that hair dressers and gardeners use and sprayed it across the roof. You could use pva and a brush but this method is a hell of a lot faster. WARNING: Do this outside unless you like glue EVERYWHERE.


Part 2: Jarl's Longhouse

I like the buildings I made yesterday but I couldnt help thinking they were a bit peasanty and i really needed to get to work on something substantial for my Jarl and his Huscarls to call home.

For this build I used: hot glue gun, scissors, craft knife, scourer pads, a ruler, a cut rectangle of hardboard as a base, 4-8 pins, lengths of 5mm foamboard offcuts and LOADS of chopsticks. 

I used about 35 chopsticks in total. They're the kind you get from Yo!Sushi and Wagamama's, the nice thick ones not the thin crappy ones Tesco give you with their second rate sushi. I hoard these and have finally found a use for them! If like me you go mad for asian cuisine and like log buildings, give yours a wipe and pocket them for later- they only go in the bin otherwise!


On to the construction- The side walls were 4.5cm high and 16.5cm long and the gable ends were 9cm wide and 10cm high to the apex. This was partly dictated to by figure scale but mostly down to what was available in my pile of offcuts.

After sticking in a few pins I was able to see what i was working with. I cut a door into one of the gable ends, using a mini for scale.


I then cut the chopsticks to the correct lengths, trimmed them up to make them look for 'loggy' and hot glued them to the face of the foamboard. The overlaps were intentional to allow for a few interlocking sections later on. Notice the red blotches? Yeahhhhh stanley knives are sharp.


So this continued around the sides, adding glue to the joining areas and leaving the pins in for extra security. I then added two panels for the roof, cut to size. This allowed me to hot glue a chimney made from the square end sections of the chopsticks to the roof. I also used the square ends to add a door frame to the front. The logs down the sides and back were less uniform that the ones on the front on purpose, i wanted a more realistic patchwork kind of look. 

See the plasticard crossed A frame top? Yeah ignore that....


I also glued a thin section between the gable ends and chimney to allow me to create the roof peak.


After deciding the foamboard crossed beams looked a bit out of place on something made of carefully carved wood, i opted to make them again from the squares left over from the beams. This was easy enough, just a bit fiddly to get the crossed areas glued in place.


WIP on the logs and crossbeams


View from the rear pre-thatch


For the thatching I cut the scourer into strips the length of the roof before carefully peeling the strips in half. Also note the extra row of chopsticks on the roof as beams? The scourer fit perfectly with their addition and I dont think they look too out of place.


Then rough up the scourer strips, literally yank on them and pull out bits here and there.


Hot glue gun them into place, starting at the bottom to allow easy layering. Use any small tufts of scouer to fill any gaps, a nice rough appearance is what were after.


I then continued layering until i reached this point, looks pretty good to me! Satsuma.


The village so far! Once its dried fully: painting!

Monday, 11 June 2012

Dark Age Buildings for 28mm wargaming- Part 1

Hey, so for this post I'll be showing some of the buildings I've been working on for my 28mm dark ages wargames. 

Theyre a mix of wattle & daub, log and thatch buildings made to represent scandinavian buildings from around 900AD

Unfortunately I hadn't taken any pics of the work in progress to get to the stage the models are at in the first pictures, but I'll cover them in a later post :)

Both the main shell of the buildings and the bases are made form 5mm foamboard. 

These are actually scraps left over from my brother's Warhammer 40,000 bunker set he sells at Famous Gaming (check him out!) but can be bought at most craft and modelling stores. They're cheap enough online too.


The building is a gable ended long house with vertical sides at about the same height as a figure. The door may look small, but you wouldn't want big doors in the freezing north! I added some beams to the roof for support and to give it a more scandinavian feel. The card on the foamboard was peeled off so a rough plank pattern could be ethed in around the model.


This is the equipment and materials needed for the roofing: hot glue gun, scissors, scourer pad without sponge and a building without a roof

The scourer sheets were 4 for 99p in a local discount store- a great bargain and addition to any scenery maker's workshop! These ones were thick enough to be peeled in half to allow for extra layers and wispy bits to create realistic clumps. Also helped to fill all the pesky holes.


I cut the sponge into strips just about an inch and a half x the length of the sponge, which happened to be roughly the same width of the building. Give them a it of rough treatment to ruffle the edges and give them a more natural look.
  Then add hot glue to the vertical side and the cross beams and layer on the scourer trips. Once both sides were layered and dry, I thought it looked like it needed some kind of ridge beam to contain the thatch so I added a few spare foamboard rods and chopped into them a bit to turn them into planks.


Added a few more tufts here and there to give it a wilder look, some gaps will be filled later with a pva and fluff coating.


Ready for painting and a PVA wash to keep all the fluff in place.


This is a triangular house. Judging by a few sources these seemed a popular structure in the dark ages, as people would store their possessions in the corners and then sleep up against them. Would also be a good foodstore.


I began trying to thatch it with the tufts cut form the shower scrubber used in the crop field build- What a ballache! Definately worth switching to the scourers!


I proceeded to cover the building in layers in the same way as the first building, adding extra fluff to fill gaps. 


Finally, this is the beginning of a corral or vegetable patch to go with the buildings. Its just a section of 5mm foamboard, cut with a bevel edge and some cocktail sticks chopped and hot glued in. Soon to be based and either filled with modelled veg or some pigs. On the hunt for some cheap small farmyard animals!

Crop field scenery project for 28mm Dark Ages wargaming- Part 2


Okey doke so this is the second part of the post following my attempt at making a crop field for my 28mm dark ages gaming. After making the crop tufts earlier, I then went to my nan's for a cuppa and found she was throwing out some horrendously tacky placemats. Horrendously tacky placemats ideal for turning into scenery bases! So I'll be using one of them for this build, along with the tufts from before. Theyre about 6mm thick, fine corkboard with a card backing so shouldn't warp but are easy enough to get through.


^thats the parts I started out with + a glue gun


THE IMPORTANCE OF BUYING GOOD TOOLS. I picked this up in poundland and it broke almost right away, what crap! 


So I switched to this much more robust stanley knife. The rectangles at jaunty angles on the board were  from me testing the size of unit bases against the whole mat to check whether it would be worth making one huge field, but I decided that that would be just too big for realistic gaming. I then marked out two rectangles and cut into them. If you use a similar material for yours dont expect to get through it in a single cut, I repeatedly scored mine with quite a bit of force before I got through.


Until it reached this stage.


I hate scenery with a 'step'. What crop field has a neat step up all around it?? None Ive ever seen. So i added a rough bevelled edge around the perimeter with my craft knife.


I then remarked the size of two unit bases- one 100mm x 80mm renedra movement tray, and one war of the ring infantry movement tray full of archers. its important to mark down the size of your units or else you cant fit them in- it may seem obvious but so many people make these mistakes!


Then arrange your tufts around the base as you like! Glue them down with a hot glue gun when youre happy with their arrangement.  I have purposely left gaps between the crops for an easier time when i base and paint the model


Both pics show some of my vikings sat happily amongst the crops ready to strike!

Ready for basing & painting!

Crop field scenery project for 28mm Dark Ages wargaming- Part 1


Hi there! This is the first of many posts I'll be making to document my recent foray into the world of Dark Age wargaming in 28mm.

In this first one ill be showing the beginning stages of a field of crops ill be using during my games. 

They also make awesome tufts of long grass for individual placement on scenery and bases.

It's a really simple build, using minimal equipment, materials and skill.


^ This is everything I used. So that's a pair of modelling clippers, a hot glue gun with a few spare glue rods, an old scrubbing brush from the shower that had seen better days (dried out) and some of the paper backings from sticky labels. The cutting board was just so I didn't wreck the tablecloth.


I wanted to make some crop- like pieces to later glue on to a board to make a simple corn field.


Gradually working my way through the scrubber.


After experimenting I found that cutting the bristles off before adding glue was a nightmare and they flew everywhere, so opted to add glue to the tops of the bristle clumps in strips making it a great deal easier.


Its ok to be liberal with the hot glue, you need to make sure the sides get coated to stop the bristles coming loose and going everywhere. It doesnt matter if a bit gets on the sides as it wil be painted as wet mud and any thick glue clumps at the base will be disguised with sand later.


Smooth the back of the sticky label over the glue while it is still warm to give it a flat base. This will make it much easier to glue on our board later.


Peel back the paper and cut off the clumps either in strips, groups or singly. If you've missed any parts add a blob more glue- its worth checking! Gently rub the clumps to remove any stray bristles and keep the loose ones for later.


This is the finished product ready for applying to the board to make a field. The one on the left is left straight and the one on the right has been bent carefully for a more wild, realistic look.


This shows how many tufts I made from under half the scrubber. The bottom left shows 2 cut bails i made from putting a small dab of glue on either end then wrapped a thin piece of wire around the centre.

Will be posting again soon for the next stage!